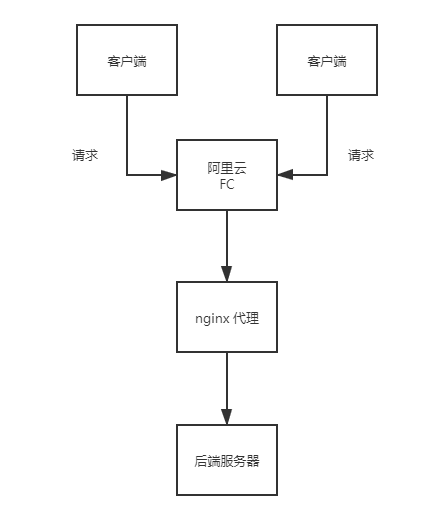
流程
配置
1
2
3
4
5
| # 安装 fun
$ npm install @alicloud/fun -g
# 进入项目目录
$ cd proxy
|
将 composer.json 放到根目录,然后创建 thinkphp 空文件夹。
1
2
| # 执行初始化下内容
$ fun deploy -y
|
.fun\root\etc\nginx\sites-enabled\thinkphp.conf
1
2
3
4
5
6
7
8
9
10
11
12
13
14
| resolver 223.5.5.5;
server {
listen 9000;
root /code/public;
index index.php index.html index.htm;
server_name localhost;
client_max_body_size 100M;
location / {
proxy_pass https://www.hongfs.cn$request_uri; # 记得替换成自己的域名
}
}
|
template.yml
1
2
3
4
5
6
7
8
9
10
11
12
13
14
15
16
17
18
19
20
21
22
23
24
25
26
27
28
29
30
31
32
33
| ROSTemplateFormatVersion: '2015-09-01'
Transform: 'Aliyun::Serverless-2018-04-03'
Resources:
proxy:
Type: 'Aliyun::Serverless::Service'
Properties:
Description: This is FC service
proxy:
Type: 'Aliyun::Serverless::Function'
Properties:
Handler: index.handler
Runtime: custom
CodeUri: ./
MemorySize: 1024
InstanceConcurrency: 5
Timeout: 120
Events:
httpTrigger:
Type: HTTP
Properties:
AuthType: ANONYMOUS
Methods: ['GET', 'POST', 'PUT', 'DELETE', 'HEAD']
Domain:
Type: Aliyun::Serverless::CustomDomain
Properties:
DomainName: proxy.hongfs.cn
Protocol: HTTP
RouteConfig:
Routes:
"/*":
ServiceName: proxy
FunctionName: proxy
|
重新执行部署后会提示域名需要解析到的地址,前往 DNS 配置后再次运行。
后期要修改的话就重新修改下 nginx 的配置内容然后重新部署即可。
fun 这东西挺复杂的,很多东西都没有资料。所以通过模拟本地存在 thinkphp 框架,然后提供需要的 nginx 环境。